
I’m going to throw a few snippets of code in here that are coming out of the current sprint, because they are generally useful. I’ll also spend a few minutes commenting what’s happening so that non-unity/C-Sharp developers can start to get a feel for it….
The snippets are code for easily generating offline Text-To-Speech and extending gestures on an Input Device.
By the way : all the code we are writing is going to be free, as in speech, in the end 😉 Thanks to the prototypefund.de!
Generating offline TTS
Firstly, it became obvious that we need more audio cues explaining where the participant is to the practitioner, and giving simple spoken feedback. We are also working on auto-generating web based control interfaces – but this type of audio control/feedback is both useful as a fallback for the guided app, and will be essential for the DIY app.
After looking into various Text-To-Speech systems (TTS) it became obvious that most require an internet connection. This isn’t good for a system we want to be used all over the world, specifically in places which may lack a good/reliable connection.
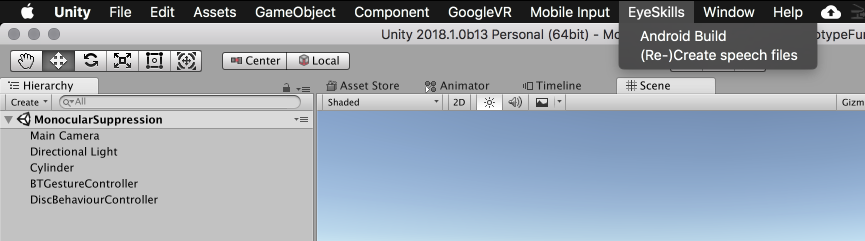
For now, I am generating offline audio using Mac OSX’s inbuilt TTS command called “say”. You can pass this a “voice” to use (for example, an english male speaker called Daniel) and some text, with which it will produce some fairly decent output. To keep this as simple, but useable as possible (maximum functionality for minimal effort) it is structured to generate the audio files from directly within the Unity API. You can see in the picture below an “EyeSkills” menu point with a “(Re-)Create audio files”. Just click on that!
The code to generate this integrated menu is very simple. The following script (class) is just plonked into an “Editor” folder in Unity :
 public class EyeSkillsMenuOptions {

    [MenuItem("EyeSkills/(Re-)Create speech files")]
    private static void CreateSpeechFiles()
    {
        CreateAudioFiles createAudioFiles = new CreateAudioFiles();
        createAudioFiles.ConvertTextFilesToSpeech("Assets/EyeSkills/Framework/Resources/Audio");

    }
}
It registers the menu option and defines a single standard place to look for data to turn to audio files.
The simplest way to implement this is to have a directory containing individual files in the format [lang]-[uniqueid].txt. The output audio file will then be named [lang]-[uniqueid].aiff. Inside the text file is the sentence to be spoken. Lets take a look at the code which manages the audio generation :
 public void ConvertTextFilesToSpeech(string dirPath)
        {
            DirectoryInfo dirInfo = new DirectoryInfo(dirPath);

            FileInfo[] fileInf = dirInfo.GetFiles("*.txt");

            foreach (FileInfo fileInfo in fileInf){
                string inputFilePath = fileInfo.FullName;
                string key = Path.GetFileNameWithoutExtension(inputFilePath);
                string outputDirPath = Path.GetDirectoryName(inputFilePath);
                string outputFilePath = outputDirPath + "/" + key + ".aiff";

                StreamReader reader = new StreamReader(inputFilePath);
                string audioText = reader.ReadToEnd();
                reader.Close();

                SpeakToFile("Daniel", audioText, outputFilePath);


            }

        }
This is all quite standard stuff : we take the dirPath specified in the menu system (which actually automatically iterates within all “Resource” folders in the Unity project looking for a match) and then iterates over all .txt files found in any matching folder.
We then massage the txt file into an appropriate output audio file name and read the text to be spoken into “audioText”. The audioText variable is then passed to SpeakToFile.
 public void SpeakToFile(string voice, string inputText, string outputFile)
        {

            string arguments = "-v " + voice + " '" + inputText + "' -o " + outputFile;

            ProcessStartInfo processInfo = new ProcessStartInfo("/usr/bin/say", arguments);
            processInfo.UseShellExecute = false;

            var process = Process.Start(processInfo);
            process.WaitForExit();
            process.Close();
        }
This took a little work before it worked correctly. We are passing it the “voice” to use, what it ought to say, where it ought to then place the output file.
We are about to ask the system (OSX) to execute a process on our behalf (the “say” command) so first we configure that process to define that the “say” command will be used with the provided arguments, without opening up an operating system shell to do so.
We then start the process, wait for it to end, and close the process. Easy.
Adding extra button behaviours to a bluetooth controller
The next snippet is still a work in progress. The goal is to allow developers to be able to easily allow users to drive EyeSkills with a variety of input mechanisms (VR Headset, BlueTooth VR Controller, Web Interface, Keyboard) – and to do this simultaneously. This is particularly interesting where multiple people are involved : e.g. parent/child, participant/researcher/doctor etc.
What we have noticed in user testing, however, is that the bluetooth controller are really limited in the range of inputs they offer. Basically, up/down/left/right and a couple of button clicks. We decided to extend (in fact, triple) the bandwidth of these inputs by modelling whether they were activated as “short clicks”, “long clicks”, or “holds”. This is interesting to look at because we have a range of potential inputs (which may grow depending on the bluetooth controller we finally settle on) and are dealing with some slightly finnickity timing issue (how long exactly was a button held?).
The original design was to also offer a “double click” mode, but this is actually surprisingly difficult with a bluetooth joystick. Because it takes quite a long time (and isn’t simple) to push the joystick with the thumb, retract it only to the neutral position and then push it back into the original position again… we are forced to wait for quite a while before deciding if the first movement (the “click”) is really a “click” or a “double click”. This makes “click” unresponsive, and can’t be designed around, so we switched to “short/long/hold”.
We use a standard Unity MonoDevelop class and initialise in Start:
   void Start()
    {
        callback = ButtonType;

        interestingButtons.Add("EyeSkills Up");
        interestingButtons.Add("EyeSkills Down");
        interestingButtons.Add("EyeSkills Left");
        interestingButtons.Add("EyeSkills Right");
        interestingButtons.Add("EyeSkills Confirm");
        interestingButtons.Add("EyeSkills Cancel");
    }
Those strings (e.g. “EyeSkills Up”) are input parameters specified inside the Unity Input Editor, which itself maps multiple device inputs to the same buttons. Note: In Unity a “key” is a physical device element, whereas a “button” is an abstract representation for multiple types of input which might be keys, joysticks etc.
Next comes the interesting bit:
 void Update(){
        if (!coroutineStarted) {
            foreach (string k in interestingButtons){
                if (Input.GetButtonDown(k)){
                    coroutineStarted = true;
                    //Now start our listening co-routine which will "block"
                    coroutine=WaitForButtonUp(k, msClick, msLong, Time.time, callback);
                    StartCoroutine(coroutine);
                    break;
                }
            }
        }
    }
The Unity Update method is called each time a frame is drawn on the screen. Everytime it enters this method, all of our interestingButtons are checked to see if any have been pressed. If they have been pressed, we are interested in finding out for how long they have been pressed. Is it a short press, a long press, or a constant hold?
There are many inelegant ways to deal with this, but the approach we are using is quite clean. We spin off a coroutine – a kind of function which executes in parallel to the calling function. This coroutine is responsible for seeing how long the button remains pressed (i.e. detecting when it comes *UP*), and as long as the coroutine is active, we prevent the Update method from iterating over any buttons (with the coroutineStarted semaphore).
The inside of the coroutine looks like this:
      IEnumerator WaitForButtonUp(string buttonKey,float msClick, float msLong, float startTime, Action<string,string> callback){
        bool up = false;
        bool holdStart = false;
        string clickType = "";
        float now;
        while (!up)
        {
            now = Time.time;
            if (Input.GetButtonUp(buttonKey))
            {
                if (now < (startTime + msClick)) //short click
                {
                    clickType = "click";
                }
                else if (now < (startTime + msLong)) //long click
                {
                    clickType = "long";
                }
                else if (now < (startTime + msLong)) //long click ending
                {
                    clickType = "holdEnd";
                }
                up = true;
            } else if (Input.GetButtonDown(buttonKey) && (now > (startTime + msLong))){ //hold
                clickType = "holdStart";
                if (!holdStart) {
                    callback(buttonKey, clickType);
                    holdStart = true;
                }

            }
            yield return 0;
        }
        callback(buttonKey,clickType);
    }
There’s quite a lot going on here. We are passing several variables to the coroutine, telling it which buttonKey we are currently monitoring, and millisecond thresholds defining when an “up” (releasing the button) event is to be considered a short click, a long click or a hold (i.e. if it comes up after the long click “msLong” has been exceeded). We also pass it a startTime which reflects the moment at which the button was originally pressed.
As long as we haven’t seen the button in an “up” (released) state yet, we stick in an infinite loop checking, checking and checking again – to see if that button has been released yet. The interesting thing about a coroutine is the “yield” statement at the end of the while loop.
The “yield” statement effectively tells the program “I have finished for now, you many continue” so Unity continues rendering the rest of its frame. As the next frame begins, unity (well, kind of) remembers that the coroutine is still running, and it should continue again from that last yield statement which is back inside the while loop (whilst restoring all the function state from the pre-yielded state).
Thanks to yield we can efficiently distribute our checking so that we only do it once per frame, and maintain all the state we need to do the time-based comparisons.
You’ll notice, that once we detect a “hold” event we emit a single “holdStart” to the callback function we provided to the coroutine, and then emit a “holdEnd” once we detect the button come up beyond the range of the short or long clicks.
An example callback function can be really simple :
 void ButtonType(string buttonID, string buttonType){
        Debug.Log("Found Button "+buttonID+ " of Type " + buttonType);
        coroutineStarted = false;
        Debug.Log("We now send event " + buttonType);
    }
This is a work in progress because the next step is to have these device classes register with a manager class which maps “behaviours” developers would like to trigger, to the named “input events” which we pass to it from these types of function. More on that later 🙂
Even though this is just prototype code, I hope it’s clear how extensible this now is. Adding new input events, and altering/adding event types is really simple.
Bye!